Monday, November 25, 2013

Garlic Cheese Biscuits

With Thanksgiving just a few days away I could post a cute craft for the table but instead I present to you Garlic Cheese Biscuits. This recipe is one I made by altering a standard baking powder recipe. They will turn out to be very similar to the addictive ones severed at a certain seafood chain that sounds like Led Robster. So instead of bringing store bought bread or heat and serve dinner rolls bring these and I promise they will impress. In addition to being extremely tasty they are very simple to make and require no special ingredients that one can never find at a grocery store. As with any recipe involving seasonings feel free to alter to your liking.

McKenna Family Garlic Cheese Biscuits
These are always a hit
  
Biscuit Ingredients (makes 12)
  • 2 cups all-purpose flour
  • 2 teaspoons baking powder
  • 4  tablespoons butter (cold)
  • 1/2 teaspoon salt
  • 1 cup Colby Jack cheese (any mild orange cheese will work)
  • 1 tablespoon garlic powder
  • 3/4 cup milk  (whole works best if you have it)
Butter Topping Ingredients
  • 4 tablespoons butter
  • 1/2 tablespoon parsley
  • 1/2 tablespoon garlic powder
  • 1 tablespoon kosher salt for sprinkling (sea salt would also work)
No need to a rolling pin or biscuit cutter
Directions 
  • Combine flour, salt, baking powder, garlic powder and mix thoroughly.
  • Cut butter into small pieces and then work into flour/season mix by hand.
  • Add cheese then mix thoroughly.
  • Pour in milk the work dough by hand until a soft shaggy dough if formed.
  • Pull apart into 12 pieces and place on a greased or non-stick pan and bake at 400 deg. for 12-14 min.
  • Make your topping while the biscuits bake as follows; melt 4 tablespoons butter then add the garlic and parsley and mix.
  • Once biscuits are baked use a basting brush to add the melted butter to the tops of the biscuits. Just a brush or two on each will do.
  • Sprinkle with a small amount of kosher salt. As always with kosher salt a little goes a long way.
  • Serve warm and enjoy!

Homemade Stew and Garlic Cheese Biscuits, Good Eats!


Tuesday, November 19, 2013

Turkey Time

It's the middle of November so let's talk turkey. I'm certain every stay at home blogger or pintrest contributor will have a similar post so here is our versions of some holiday classics. Like I said i'm sure you have all seen these before so while these may not be new lets hope there a bit different than the norm and you pick up a couple ideas.

No-Paint Turkey Hands
 
The no-paint idea is simply dad's way of avoiding the mess that hand paints bring. Instead of the usual paint on the palm and fingers we traced with crayons of different colors. Same cute turkey, without the mess. All you will need is crayons, white paper and someone's hand.


Construction Paper Turkey
 
As with the hand turkey this is a minimal mess craft. Some construction paper and a pair of scissors is all you really need for this one.  Trace out the desired shape of your turkey as well as the hands of the feather donor. Adults can just use there imaginations with the feathers. Make a beak with the scraps and glue to your turkey body.  The lack of instructions is intentional it's a turkey and were all adults here.

Feel free to add colored eyes, it's less creepy that way

Monday, November 4, 2013

Puree Those Pumpkins


Now that all the trick or treating is done what to do with all those pumpkins. Well believe it or not pumpkin puree is actually made from pumpkins and you can in fact make it. Now most people might think this sounds crazy but its very simple. Not quite as easy a opening a can of orange goo labeled pumpkin filling but easy none the less.


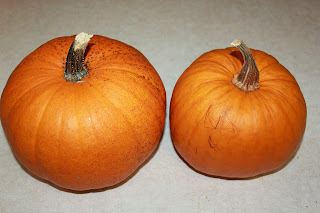
Don't toss them, bake them
First you will need to cut open and clean those pumpkins. You can use your jack-o-lanterns if you like since there already clean. Just make sure the bugs haven't gotten to then and there still firm. I will typically quarter the smaller ones and the bigger ones just cut into pieces. You will also find that cleaning is much easier when the pumpkin is in pieces.

Once you have cleaned out you pumpkins, place onto a clean cookie sheet skin side down. Place in a oven that has been heated to 350 degrees. Bake for about one hour or until the skin can be peeled off easily.
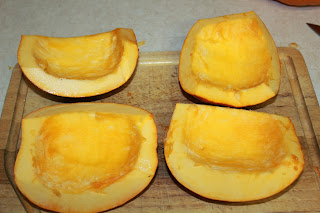
Quartered and clean, ready for the oven

Allow to cool then peel the skin by hand or use a knife to cut off the skin. Next cut your baked pumpkin into pieces and place into a rotating cutting device of  your choosing.  Blender, food processor or whatever else might do the job. Once its puree it doesn't really matter how it go there.  All pumpkins are different so you may need to add water to get the correct consistency. Semi-liquid would be the best way I could describe the texture.

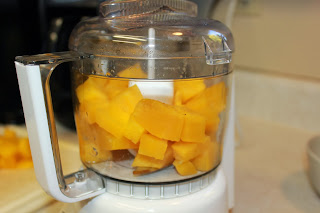
Food Processor, Blender or Juicer all will work
That's it, your fresh puree is now ready for your favorite pumpkin recipes. Use instead of the canned garbage in pie, bread or whatever pumpkin treats fit your fancy. A favorite around our house is pumpkin bread. It's similar to zucchini bread in texture and ease of making.
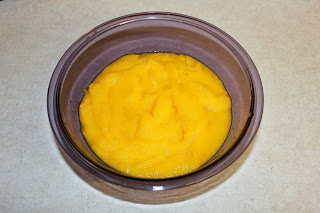
Puree Goodness
This recipe comes from Simply Recipes .


Pumpkin Bread Recipe (makes one loaf)

Ingredients
  • 1 1/2 cups flour
  • 1/2 teaspoon of salt
  • 1 cup sugar
  • 1 teaspoon baking soda
  • 1 cup olive oil
  •  1 cup pumpkin purée
  • 2 eggs, beaten
  • 1/4 cup water
  • 1/2 teaspoon nutmeg
  • 1/2 teaspoon cinnamon
  • 1/2 teaspoon allspice
  • 1/2 cup  chopped walnuts (optional)

Directions

1 Preheat oven to 350°F (180°C). Sift together the flour, salt, sugar, and baking soda.
2 Mix the pumpkin, oil, eggs, 1/4 cup of water, and spices together, then combine with the dry ingredients, but do not mix too thoroughly. Stir in the nuts.
3 Pour into a well-buttered 9x5x3 inch loaf pan. Bake 50-60 minutes until a thin skewer poked in the very center of the loaf comes out clean. Turn out of the pan and let cool on a rack.
Can easily double the recipe.