Wednesday, December 11, 2013

Make Your Own Wreath


Tis the Season for Wreaths, so why buy one pre-made when you can make one that will be uniquely yours. With just a few items from the store or gun range you can make your front door stand out from the neighbors. The first wreath was made last year using a plain wreath and spent shot shells. The second was made with a length of garland purchase at Wally World. I feel kinda silly even posting about this because it's so simple and easy. The fact that I hadn't done either of these til the last 2 years says to me that while easy it might not come as an idea to some including myself. So pardon my lacking of detailed instructions because there really isn't much to it.


Shotgun Shell Wreath
Add caption

  
Items Needed
  •  Spent shot shells of varying color. Winchester typically uses red shell, Remington typically green. Different gauge shells also adds to the look
  •  Hot Glue Gun and Glue
  • One bare wreath

Directions

  1. Go Shooting with some buddies and save all your shells.
  2. Glue Shells to wreath. That's it, no need to over think this folks just shoot then glue. The order however is pretty important. I wouldn't recommend glue then shoot.

Traditional Wreath

We made the wreath below with a $2.00 section of garland I purchased at Wally World. My wife and daughter made some felt ornaments for it as well. The wreath was made by making a circle the size we wanted the wrapping the remaining section of garland around the circle. Add your own decorations like mini candy canes or ornaments


Monday, December 2, 2013

Hidden History at Folsom Lake


For those of use that were not around before 1955 what lies beneath the waters of Folsom Lake is mystery. The Folsom Dam was finished in 1955 and with it's completion miles of river were lost as were the historical sites that now are part of Folsom Lake. The lake is currently at only 25% of capacity and that has exposed many areas that are typically well under the surface.  Some of the sites include the former town of Mormon Island, the original Salmon Falls Bridge and the dam site of a dam dating to the 1860's.

Old Salmon Falls Bridge
We set out for the Old Salmon Falls bridge after parking off of Salmon Falls Road at Falcon Crest. I'm cheap and the 10 minutes of additional walking is well worth avoiding a $10 day use fee. After parking the car walk into the day use area and the bridge will become visible. Don't try to find a trail, it's usually underwater so you can probably figure out why there isn't one. We pretended to be walking under water, and the girls loved the wide open space to explore.  On our way we passed old foundations and crossed a creek running towards the river. We really just scratched the surface of what is out there to find a see.
Foundation at Salmon Falls 1918

Once we reached the bridge the girls explored some more and enjoyed the nice set that an old abutment made. Having never seen this section of river before it became a lake it was very neat. It's unfortunate that the lake is this low but it provided a very cool place to walk around and explore. Unfortunately it seems that these sites are exposed and accessible more than they used to be. While it may not be good for boating it's great for hiking. I hope to make it back for some more exploring before the lake covers them once again you should too.
Walking across the bridge


Monday, November 25, 2013

Garlic Cheese Biscuits

With Thanksgiving just a few days away I could post a cute craft for the table but instead I present to you Garlic Cheese Biscuits. This recipe is one I made by altering a standard baking powder recipe. They will turn out to be very similar to the addictive ones severed at a certain seafood chain that sounds like Led Robster. So instead of bringing store bought bread or heat and serve dinner rolls bring these and I promise they will impress. In addition to being extremely tasty they are very simple to make and require no special ingredients that one can never find at a grocery store. As with any recipe involving seasonings feel free to alter to your liking.

McKenna Family Garlic Cheese Biscuits
These are always a hit
  
Biscuit Ingredients (makes 12)
  • 2 cups all-purpose flour
  • 2 teaspoons baking powder
  • 4  tablespoons butter (cold)
  • 1/2 teaspoon salt
  • 1 cup Colby Jack cheese (any mild orange cheese will work)
  • 1 tablespoon garlic powder
  • 3/4 cup milk  (whole works best if you have it)
Butter Topping Ingredients
  • 4 tablespoons butter
  • 1/2 tablespoon parsley
  • 1/2 tablespoon garlic powder
  • 1 tablespoon kosher salt for sprinkling (sea salt would also work)
No need to a rolling pin or biscuit cutter
Directions 
  • Combine flour, salt, baking powder, garlic powder and mix thoroughly.
  • Cut butter into small pieces and then work into flour/season mix by hand.
  • Add cheese then mix thoroughly.
  • Pour in milk the work dough by hand until a soft shaggy dough if formed.
  • Pull apart into 12 pieces and place on a greased or non-stick pan and bake at 400 deg. for 12-14 min.
  • Make your topping while the biscuits bake as follows; melt 4 tablespoons butter then add the garlic and parsley and mix.
  • Once biscuits are baked use a basting brush to add the melted butter to the tops of the biscuits. Just a brush or two on each will do.
  • Sprinkle with a small amount of kosher salt. As always with kosher salt a little goes a long way.
  • Serve warm and enjoy!

Homemade Stew and Garlic Cheese Biscuits, Good Eats!


Tuesday, November 19, 2013

Turkey Time

It's the middle of November so let's talk turkey. I'm certain every stay at home blogger or pintrest contributor will have a similar post so here is our versions of some holiday classics. Like I said i'm sure you have all seen these before so while these may not be new lets hope there a bit different than the norm and you pick up a couple ideas.

No-Paint Turkey Hands
 
The no-paint idea is simply dad's way of avoiding the mess that hand paints bring. Instead of the usual paint on the palm and fingers we traced with crayons of different colors. Same cute turkey, without the mess. All you will need is crayons, white paper and someone's hand.


Construction Paper Turkey
 
As with the hand turkey this is a minimal mess craft. Some construction paper and a pair of scissors is all you really need for this one.  Trace out the desired shape of your turkey as well as the hands of the feather donor. Adults can just use there imaginations with the feathers. Make a beak with the scraps and glue to your turkey body.  The lack of instructions is intentional it's a turkey and were all adults here.

Feel free to add colored eyes, it's less creepy that way

Monday, November 4, 2013

Puree Those Pumpkins


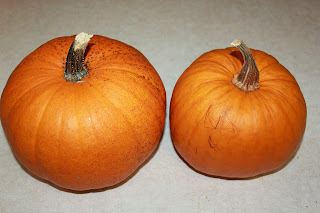
Now that all the trick or treating is done what to do with all those pumpkins. Well believe it or not pumpkin puree is actually made from pumpkins and you can in fact make it. Now most people might think this sounds crazy but its very simple. Not quite as easy a opening a can of orange goo labeled pumpkin filling but easy none the less.


Don't toss them, bake them
First you will need to cut open and clean those pumpkins. You can use your jack-o-lanterns if you like since there already clean. Just make sure the bugs haven't gotten to then and there still firm. I will typically quarter the smaller ones and the bigger ones just cut into pieces. You will also find that cleaning is much easier when the pumpkin is in pieces.

Once you have cleaned out you pumpkins, place onto a clean cookie sheet skin side down. Place in a oven that has been heated to 350 degrees. Bake for about one hour or until the skin can be peeled off easily.
Quartered and clean, ready for the oven

Allow to cool then peel the skin by hand or use a knife to cut off the skin. Next cut your baked pumpkin into pieces and place into a rotating cutting device of  your choosing.  Blender, food processor or whatever else might do the job. Once its puree it doesn't really matter how it go there.  All pumpkins are different so you may need to add water to get the correct consistency. Semi-liquid would be the best way I could describe the texture.

Food Processor, Blender or Juicer all will work
That's it, your fresh puree is now ready for your favorite pumpkin recipes. Use instead of the canned garbage in pie, bread or whatever pumpkin treats fit your fancy. A favorite around our house is pumpkin bread. It's similar to zucchini bread in texture and ease of making.

Puree Goodness
This recipe comes from Simply Recipes .


Pumpkin Bread Recipe (makes one loaf)

Ingredients
  • 1 1/2 cups flour
  • 1/2 teaspoon of salt
  • 1 cup sugar
  • 1 teaspoon baking soda
  • 1 cup olive oil
  •  1 cup pumpkin purée
  • 2 eggs, beaten
  • 1/4 cup water
  • 1/2 teaspoon nutmeg
  • 1/2 teaspoon cinnamon
  • 1/2 teaspoon allspice
  • 1/2 cup  chopped walnuts (optional)

Directions

1 Preheat oven to 350°F (180°C). Sift together the flour, salt, sugar, and baking soda.
2 Mix the pumpkin, oil, eggs, 1/4 cup of water, and spices together, then combine with the dry ingredients, but do not mix too thoroughly. Stir in the nuts.
3 Pour into a well-buttered 9x5x3 inch loaf pan. Bake 50-60 minutes until a thin skewer poked in the very center of the loaf comes out clean. Turn out of the pan and let cool on a rack.
Can easily double the recipe.

Monday, October 28, 2013

Stained Leaf Craft

By now your yard is probably covered in leaves. No yard, no problem your neighbors or that shopping center down the street will have plenty. They won't even mind if you pick up a couple, promise. This craft turned out to be one of my favorites that we have done. It's pretty amazing what a few leaves and some melted crayons can look like when placed on a window. Our house only has one type of leaf that would work for this craft so we made a scavenger hunt out of it. It really isn't much of a scavenger hunt but that sound better than look for "dead leaves" and it will make more fun for the kids. After you have collected all of your leaves we are ready to start.


Stained Leaves

Items Needed
  • Crayons (broken bits work just fine)
  • Wax paper
  • Construction paper
  • Leaves
  • Iron
  • Old shirt or clean rag
  • Scissors
  • Glue

  1. Smash, shave or destroy your crayons in one way or another. The smaller the pieces the better.
  2. Cut 2 pieces of wax paper. Make about the lenght of the construction paper.
  3. Lay out the leaves on the wax paper.
  4. Sprinkle your crayon shavings onto the leaves and the paper.
  5.  Cover with wax paper. 
  6. Cover top and bottom surface of the wax paper with the old shirt or rag. I will get hot and the crayon will leak through a bit. 
  7. Iron the wax paper until the crayons are melted and the wax paper is sealed together. If you look closely at the wax paper it will be pretty clear where it has melted together and sealed properly.
  8. Allow to cool the cut out you edging from the construction paper.
  9. Glue your edges around the border and trim wax paper if needed.
  10. Tape to any sun exposed window and enjoy.

Tuesday, October 22, 2013

Pretzel Pumpkins and Boa Vista Orchards

As most that read this blog have figured out we like to make treats at our house. These are some of the easiest treats you can make. Most of ours did not really end up looking like pumpkins as my daughter Kaelin made all but a few by herself. They are something that anyone over the age of about 3 can do by themselves and that makes a perfect project for when Mom or Dad are busy making dinner. You can also add other candies if you chose to.

Items Needed

  • Orange Food Coloring
  • White Almond Bark
  • Small Pretzels 
  • Green M&M's

Directions

  1. Separate the green M&M's from the rest of them. Set aside.
  2. Melt almond bark
  3. Color to desired level of orange
  4. Dip the pretzel in the almond bark until fully covered
  5. Add the green M&M as the stem
  6. Allow to cool
Add caption    

Boa Vista Orchards
 
October not only means Halloween and changing leaves it's Apple Hill season.We live close enough to make weekly trips for produce and a picnic. While most do not have the luxury of living 10 minutes away so a weekly visit will be excessive for most. My usual go to is Boa Vista Orchards. This is not to say it's the biggest or the best as there are many farms and orchards in the Apple Hill area, each filling a unique niche. There are some where you pick your own, others with hay rides, some have large craft exhibits others are only produce. 

Boa Vista is a favorite of ours for it's convenience. It is one of the closest to Placerville and is very easy to get in and out of. There are several craft booths if that's your thing as well as a small deli with lunch items. The store is open year round with local produce and stocks everything people have grown accustomed to at Apple Hill. Carmel Apples, doughnuts, pies and cider are among all the yummy goodness you will find. 

Our girls love picnic time at Boa Vista. They have a nice picnic area across from the store located next to the pumpkin patch. Thankfully Kaelin and Leah enjoy the simple things, picking their own apples is a big deal and they always look forward to it.  Week days are much better for visiting than the weekends but if that's not possible pack a lunch and make the best of it.

Helpful Apple Hill Links