Sunday, October 13, 2013

1 year Breadiversary

I love bread. To those that know me well this comes as no surprise. I love all types of breads,wither its sweet bread with apple cinnamon filling, biscuits, challah or sourdough and most everything in between. A couple of years ago my wife bought a sourdough starter pack to see if she could make my most favorite bread. Our first starter lasted many months and we found that homemade sourdough could was quite tasty.

After moving to the hills last year I decided one day that we should try to make our bread at home. I started with a breadmaker my parents hadn't used in ages. This was short lived however, I found myself frustrated by the lack of variety in bread machine recipes and started making our breads from scratch.  We decided very early to attempt not to purchase any bread from the grocery store. One year later I can proudly say WE did it. While I make most of our bread my wife has certainly helped in this.

There are many reasons why one might attempt this. Homemade bread is much healthier than mass produced and for this reason alone it's a great idea. There is nothing that goes into our bread that I can't say or spell(please don't test the spelling part). It does go stale quicker but I feel that's a small price to pay for the quality of food your consuming. Cost is another reason, as a single income family we save money where we can and this is great way so save money. A loaf of wheat bread at the grocery store can be $4. I can make a loaf of wheat bread for less than $.50. It doesn't take very long for it too add up. Quality is the pleasant bonus to the cost and healthy factors. Nothing beats the taste or smell of fresh baked bread wither its garlic bread for pasta or burger buns for some BBQ.

I didn't write this post with the intention of bragging. It's more of a challenge. If your reading this you have the ability to make bread, promise. You don't have to give up buying bread at the store but you might want to after trying it. Before you say I don't have time know this, most breads only take 15-20 mins to make the dough and only require 1-2 hours rise time. Half of the dough time involve no work while you can gather the other ingredients. Rising takes no effort at all, the yeast does the work for you.
 
Below is a recipe out of my favorite bread book The Bread Bible . This recipe is for French Bread and I believe it is one of  the best breads for a beginner. It requires very few ingredients and tastes very, very good. Try with garlic butter for some homemade garlic bread the next time you have pasta.

A few general bread making tips to get you started 
  • Try to avoid instant yeast if making by hand. It is intended for bread machines.
  • Don't forget the butter in the microwave. I've made this mistake more times than I care to     admit.
  • Buy your yeast in bulk. Small packets of yeast may be convenient but they are also very costly per unit. We use Red Star from Amazon for $9 per 2 pound bag.
  • Learn you kneads. Wheat bread responds differently to kneading than Hamburger Buns. Don't expect them to feel the same and learn what if feels like when its properly kneaded.
  • Involve your kids. They can measure, pour, stir and even help you knead.
  • Don't be scared, it's only bread.
  • If at first you don't succeed, try again.
French Bread

 Makes 2 large Baguettes or several Sandwich Rolls

2 cups warm water (105-115 deg)
1 1/2 tablespoons active dry yeast
1 Tablespoon sugar
3 cups bread flour
1 tablespoon salt
About 3 cups unbleached four

Egg Glaze (optional)
1 large beaten egg
2 teaspoons water
  1. In a large bowl using a whisk pour in the warm water and sprinkle the yeast and sugar over the surface of the water. Stir until combined . Let sit until dissolved and foamy, about 10 mins.
  2. Add 2 cups of bread flour and the salt. Beat hard until smooth. Add the remaining cup of bread flour and most of the all purpose flour , 1/2 cup at a time, until a shaggy dough that clears the bowl is formed.
  3. Turn the dough onto a lightly surfaced work surface and knead until soft silky and resilient, 5-8 min, dusting with flour as needed to prevent sticking. The finished dough should not be sticky
  4. Place the dough into a lightly greased bowl (veg. oil works very well). Turn once to coat the top and loosely cover with plastic wrap. Let rise in a cool area until tripled in bulk. If time allows you can "punch down or deflate" and let rise again for 1 hour.
  5. Gently deflate the dough and form your rolls of baguettes. Cut the tops of the loafs no more than 1/4 in deep every few inches.
  6. Directly after forming apply glaze if desired and place on the middle rack of cold oven. Turn oven on to 400 deg and bake for 35-40 min or until crusty and loaves sound hollow when tapped.
  7. Serve warm and enjoy! 

Note: These directions above are the basic version of the recipe. You can let rise a second time(30-40min) before baking if you chose the bake a 400 deg  until crusty. You can also apply a second coat of glaze halfway through if you desire a heavily glazed bread. Only 2 of you, cut in half for one good sized baguette.

Tuesday, October 8, 2013

Coffee Can-O-Lantern

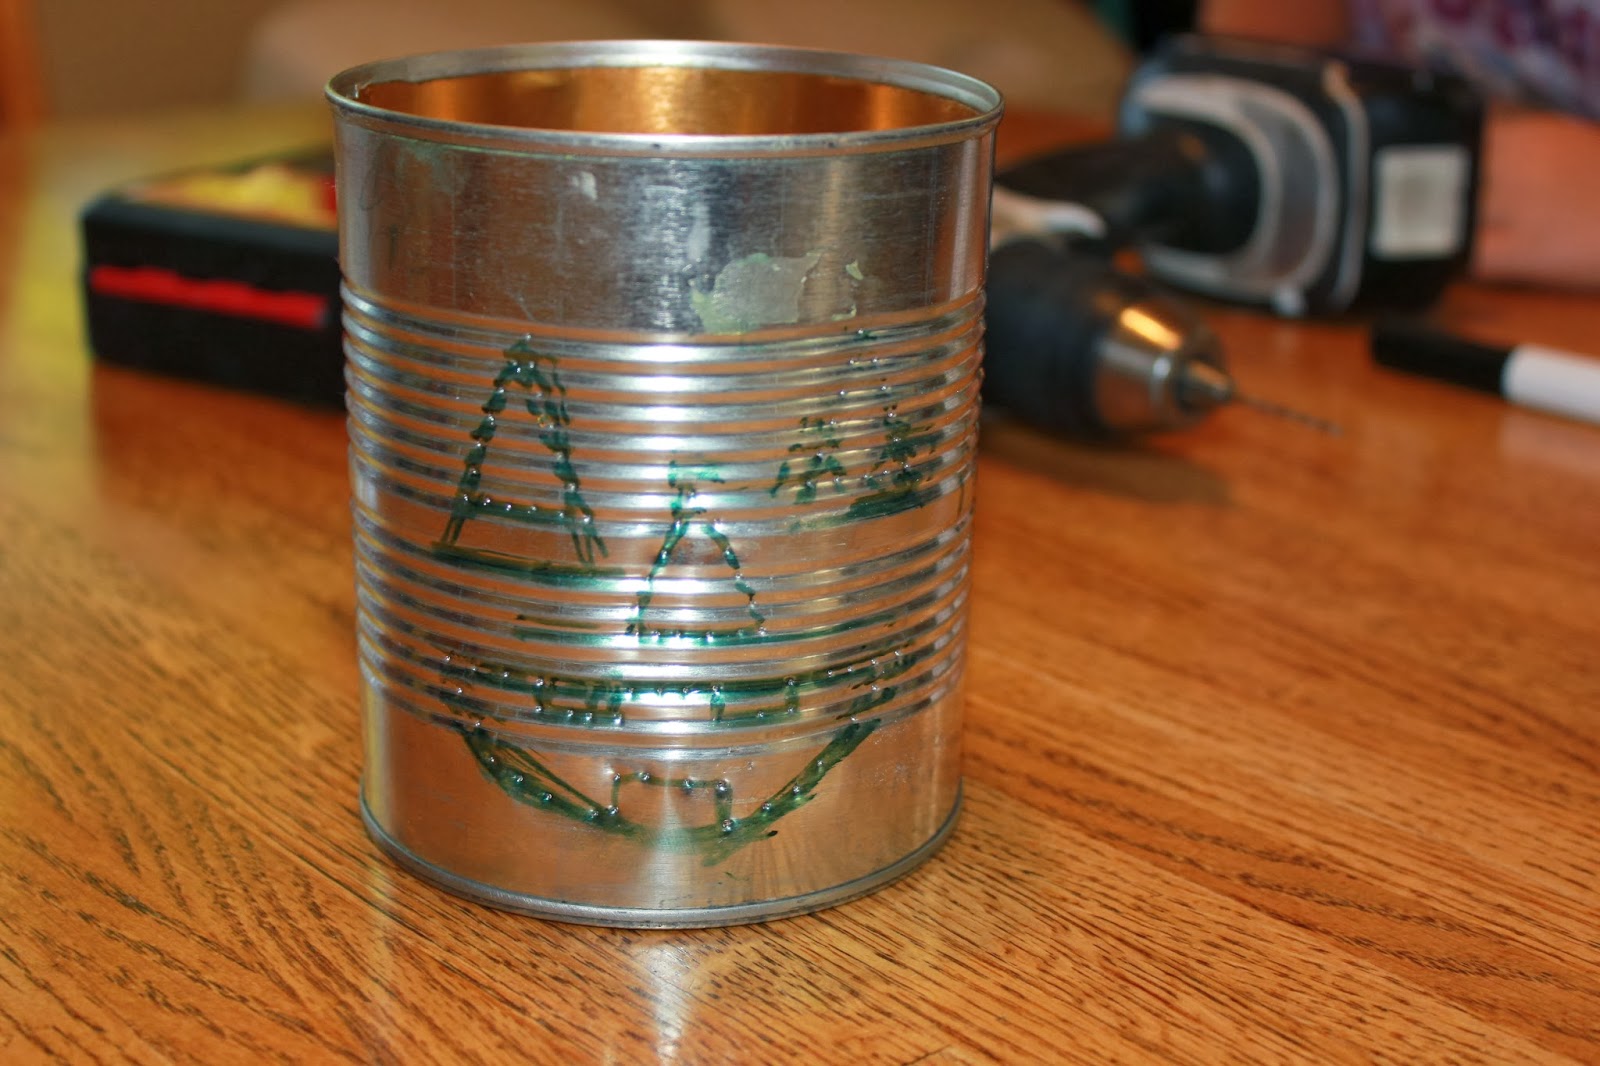
As promised I have another Halloween craft for everyone to try. This one will be far easier than the door hanger project. The idea can to me one morning after I found myself with yet another empty coffee can and an overly excited 4 year old. It reminded me of going to my Grandparents house on Halloween and blowing out the candles on all the luminaries that they would light for the neighborhood kids. Grandma and Grandpa may not have had the best candy but, they did have tons of candles to blow out.

This memory fueled little craft will be coffee can jack-o-lanterns. These can be made with a standard metal coffee can or if your the Starbucks kind(your wasting your money) you can use cleaned canned food cans. We used 28 oz tomato cans for the small ones shown. This can be done on a cool fall morning and be done in time to light the same night. Our oldest absolutely loved this project, she got to draw her own design and with my help she drilled the holes. Dad's (or Mom's) this is a great opportunity to teach your kids about how a drill functions as well as another opportunity to drive home that tools are not toys. This is especially important with sharp tools like drills or if your a former mechanic with more tools at home than any normal homeowner could ever need. Don't have a drill, well does your dad, grandpa or neighbor? If they do ask to borrow and make them one as a thank you. As a guy that loans tools occasionally I think more kids need shown how to return tools in a timely manner anyway. Still no luck? Fear not, you could get by with a hammer and a punch or screwdriver to make your holes. That should just about cover any possible excuse you could think of not to do this.

Items Needed
  • Tin Cans
  • Primer, Orange Paint
  • Drill and Drill Bits
  • Marker
  • Candles
  • Metal Polish (optional)
  • Center Punch (optional)

Lets Pluck This Chicken

1. Prep and clean your cans. Make sure all the food product is out and no sharp edges are exposed.
Only need a few tools for this project

2. Draw your design on the can.

Our Artist at work
3. If you have an available center punch use it to punch out the design. This will make drilling the holes     much easier.

With a little help from dad it's ready for the drill
4. Drill out the design. We used a 5/64th drill bit. Any bit under 1/8th inch should work fine.

5. Paint, apply primer first for ease of painting. Do not paint the inside of the cans as you need the     
    shinny finish to reflex the light of the candle. A toothpick will help clean out paint from the holes 
    during painting.

Mom helps with the painting


 6. Light and enjoy the your hard work. Not enough light coming out? Try pollishing the inside of   
     the can with some metal polish.
Dads, Dad and Kaelins, Kaelin and Moms on display


We Play For October......

I will freely admit that I have a problem. Every October I watch an unhealthy amount of baseball. This is quite a feat due to the fact I watch or listen too most A's games and a quite a few other games every week. This only gets worse because of the playoffs. My issue isn't that my pants fit tighter or my couch gets worn, it those damned ads. It seems that the advertising executives at MLB, Chevrolet, and Budweiser only make one ad for the entire playoffs. Every commercial break its the same ads for and entire month and while it may drive me nuts my kids certainly take note of them. For the last 2 years Kaelin has know October as Chebie Twuck Month. She thinks that Stevie Wonder is a singer for Bud-Light ads. And now she is walking around our house in a semi-serious voice telling me "we play for October". Oh the power of marketing. I guess this could all be prevented if I just turned off the TV and read about the games the next day but since that will never happen i'll keep dancing to Bud-Light ads during Chevy Truck month while we all play for October.

Wednesday, October 2, 2013

Jack-O-Lantern Door Hanger


It's that time of year. The weather is cooler, the leaves are turning and most importantly playoff baseball. All this can only mean it's fall and time to start getting ready for Halloween.  Over the course of the next couple posts I'll show some crafts ranging from slightly difficult and time consuming to some that take only minutes. We have spent minimal money creating all of these out of stuff we had around the house. The door hanger cost less than $1 since I had everything else needed already. I'm starting with the hardest because it does take some time to do. Once done the results were great, and my wife whom is a closet trinket lover was very happy to have another seasonal decoration.

The door hanger I'll show you today was more time consuming than difficult. This can be made with any good sized piece of scrap wood you can dig up. Ours was made from a firewood round I had recently cut in the forest. I cut an evenish round approx 1in thick. Now the thickness is not terribly important and neither is the size. You will see no dimensional measurements on this guide. Last time I saw a pumpkin patch no two were alike so make yours whatever shape fits you fancy. There are many steps that the kids can help with. Our 4 year old helped with the sanding and painting.

Items needed
  • 1 Piece of scrap wood  (14x14 might be the smallest you want but i promised no measurements)
  • Orange paint
  • Black paint
  • Spray sealant (enamel or lacquer)
  • Wire (coat hanger will work if that's all you have)
  • 2 eyelet hooks
  • Masking tape
Tools needed
  • Jigsaw
  • Sander, hand sanding will also work 
  • C clamps
  • Pencil
Let Get Started
  • Draw out the design you intend to cut. I would suggest pencil instead of pen. We did not use any pattern and don't forget the stem. 
  • Cut out your pattern with a jigsaw. Use a fine saw blade if possible
     
  • Shape and sand. If you have a wood rasp you can shape further at this point, flatten high spots and get those curves just like you want. Since ours was cut with a chainsaw it took quite a bit of sanding to get smooth. Commercially cut wood will be far easier.
  • Paint the background color and stem
  • Mask off entire pumpkin then cut out the face
  • Paint the cut out section and let dry
  • Remove masking tape

  • Finish with protective coating
  • Add eyelets to the top and string wire between
  • Hang on door and await the accolades


Tuesday, September 24, 2013

Pinnacles National Park

So new as a National Park it still has many Monument signs
As a family we like to camp so given that fact that money is tight on one income our vacations often involve camping. It took me many years to realize that was why we camped as children, I just thought my parents really liked it.  We don't have a traditional spot we go to every year instead we try to visit a new National Park every year. Living in the west we are blessed with an abundance of natural beauty within driving distance. We are starting to run out of new parks in California and we needed something within a few hours. We learned a hard lesson taking an 18 month old on a 9 hour drive to Death Valley. Our choice was Pinnacles National Park which lies approximately 45min south of Hollister Ca.

Pinnacles NP is the countries newest National Park. However it has been in the National Parks system for over 100 years as a National Monument. The parks two main attractions are the rock spires and outcroppings formed from an ancient volcanic field and the other is the Talus caves. The Caves are some of the largest Talus Caves in the world .A Talus Cave is not a cave in the traditional sense it is a cave formed by boulders falling a narrow canyon and sealing the top. Some other attractions of the park are the 30+ California Condors which was reintroduced into the parks in 2003. It is also a climbers paradise and much of the park has hiking trails specifically for climbing access.

We chose to go the week after the Labor Day holiday. Last year we discovered that nobody camps that week. It is really quite nice, the weather is still good and the summer crowds are gone. After the kids start school that will go away but for now we love it. We arrived at Pinnacles mid afternoon and found the park empty. The park has 134 camp sites and 5 were occupied the night we stayed. The park is split due to the lack of a road connecting the east and west sides. The campgrounds have flush toilets and showers for those of you who prefer those amenities. An added perk was a swimming pool, the park has no lake or river for cooling off so they have a very nice swimming pool.  Our girls were very pleased to be able to play in the pool after driving all day. On an evening walk we got to seem many deer, rabbits and quite a few bats.

Inside the Caves
We hiked the next morning to the Bear Gulch Caves. It took a little convincing to get Kaelin into them but once in she loved it. There were several times we had to take Leah out of the kid carrier due to low clearance. The hike to the cave was uphill but not difficult and most little kids should be able to make it.  The caves are also home to an endangered species of frog which seemed to us to be quite plentiful given the high numbers we were able to see.  We exited the cave and were able to see a small portion of the rock formations from Bear Gulch Reservoir. We headed back to the truck for our picnic and for Kaelin to complete her Jr. Ranger worksheet. She left the ranger station with a giant smile, new badge and even a patch for her efforts.
Snug fit at times

At this point we headed out to finish the rest of our road trip. We spent several hours on Hwy 1 trying to figure out why exactly Teddy Roosevelt had found it so special. This isn't meant to be a knock on the park it's just that we get spoiled with places like Yosemite and Death Valley. Not every park can be that awe-inspiring but we were a little underwhelmed. We decided that we really needed to see the other side of the park before we passed judgement.  So on our way home from the coast we did just that and checked out the park from the West Entrance.

Being such a small park it would be easier to hike from one side of the park than to drive it. Our kids prevented that hike from happening so we drove in from the west. This entrance has a brand new visitors center and provided a much better view of the formations. We attempted a to hike further into the park to check out some of the cooler formations but after fighting the kids for 10 mins we called it a day. The west end seems much closer to the bigger formations in the park as well as a chance to see the condor.

Rock formations from the West Side Visitors Center
We left still slightly puzzled as to why Teddy felt the need but it was still worthwhile. It is unlike anything else in the area and seems more like a scene out of the desert than on the coast. We will return without the kids to do some hiking and explore some more of the park and I would recommend anyone checking it out. We both felt strange not being completely in awe and while that might not speak well of Pinnacles it goes to show how spoiled we are being so close to so much extraordinarily beautiful country.
Bear Gulch Res.

Sunday, September 15, 2013

Cal Fire Family Day

 
We were lucky enough to attend a Cal Fire Family Day recently. While this event was not a public event there are many local fire departments that offer tours. The event was held at the Cal Fire Academy in Ione, CA. We were treated to a whole host of demonstrations as well as a great lunch and lots of extreamly helpful Cal Fire employees.

Our tour started with a walk down "main street". Here was the heart of the hands on training that all of the firefighters at the academy must complete. There was a mock roof set up for roof venting exercises. A garage type structure that they will start fires in then give lectures on how the fire progresses with the cadets inside.  They gave demonstrations on a 5 story building for emergency ladder escapes and repelling. The creepiest building had to be the "haunted house" which was 2 story structure that they will fill with smoke to the point of zero visibility. The cadets must exit a maze or debris and wiring which resembles a house that the roof has collapsed. Their only time limit is their air supply.  There was a vehicle airbag deployment excise in which Elmo was blown 50 feet in the air. Now being a former mechanic and known vehicle crasher the violent power of an airbag is nothing new to me. There were however many people who had never witnessed an airbag deployment. I'm pretty certain that a few folks moved their seats back after having witnessed what an airbag is capable of.

Used for repelling and ladder drills


After a fantastic lunch there was a law enforcement demonstration. This came as a surprise as I was unaware that Cal Fire had Peace Officers. There are roughly 200 Cal Fire Law Enforcement Officers statewide that mostly investigate wildfires in the state. These men and women not only carry the responsibility of being Peace Officers but must also carry full fire and medic gear in there vehicles with them. They must be able to serve on fire lines as well as serve warrants. Pretty impressive range of duties. The officers complete the same training that CHP or your local Sheriff complete. The academy also has there very own gun range on site. They had most of the equipment used by the LEO's on display for people to try on and had a patrol vehicle open as well.
Shannon is riot ready

Back draft.  Most of us have seen the movie or been to Universal Studios and gone on the ride. We were lucky enough to see an actual one in full force. This was enhanced by the step by step explanations of what was occurring by the instructors. The demonstration is used to teach firefighters the signs and symptoms of a back draft. This teaching aid only became available 2 years ago and prior to that the fire cadets were shown video on what it looks like. This was a very neat demonstration however the lessons learned for the firemen are very real. These occur very rarely in real life but are extreamly dangerous to personnel when the do occur. I also learned the smoke is a combustible under the right conditions. They started the outside of the container on fire with just the contact from a flare.
While it's a little tough to see that is a fireball shooting out of the container
The final demonstration was rides in the fire trucks. Who doesn't want to ride in a fire truck? The look on my daughters face was priceless. If a face can say "holy crap i'm riding in a fire truck" it did. It was again staffed by a very nice instructor who actually seemed to be enjoying themselves.

Thank You again to my sister whom we were guests of and the Cal Fire Academy. All of the instructors and employees were extreamly helpful and I would say everyone learned something today. There was a genuine enthusiasm that was very evident and I'm not quite sure who enjoyed themselves more the kids or the adults. Great Job Cal Fire!

Cal Fire Facts
  • Responsible for 31 million acres 
  • On average repsond to 5,600 wildfires and 350,000 non wildfire emergencies a year
  •  48 various aircraft used
  • 4,300 inmates, wards or CCC are used annually


Monday, September 9, 2013

Watermelon Lemonade


Watermelon has to be one of the very best fruits the summer season has to offer. But after 3 straight weeks of watermelon from the garden our intake has certainly slowed down. It was time to get creative. What I ended up with proved to be unique and tasty, watermelon lemonade.

Watermelon Lemonade Recipe
  • 6 cup fresh watermelon with seeds removed
  • 3 cups pre-mixed lemonade
  • 1/4 cup lemonade powder mix to adjust stength as desired 

  1.  Prepare 3 cups lemonade and set aside
  2. Cut watermelon into cubes and place in blender
  3. Blend watermelon until liquid
  4. Strain pulp if desired
  5. Mix lemonade with watermelon juice and chill
  6. Enjoy!


Sunday, September 1, 2013

Road Trip Survival Pt. 2

Now that our bags are complete we need to fill them. Depending on how long you trip is going to be adjust your level of entertainment. Our trip is going to be a moderate driving trip. We learned the hard way about an 18 month old and super long road trips in Death Valley. Now there are certainly those of you reading this now thinking, why not bring the tablet or turn on a movie. There is a very simple reason, we don't own either and wouldn't do it if we did. If you have teens my only advise would be, take a trailer and lock them inside. No trailer? No problem, a small investment on quality rope won't cost very much and just imagine how much more room you will have with them tied to the roof.

Filler Ideas
  • Build Your Own Coloring Book. There are many online galleries for ready to print coloring pages. Include some connect the dot style pictures too.
  • Tic-Tac-Toe. Print a few pages of simple grids for your kids to play together or with your navigator.
  •  Scavenger Hunts. Make a scavenger hunt for your trip. I made ours with pictures since our daughter cannot read yet. You can also make one with license plates from different states.
  • Color Pencil's. Most of us take vacations when the weather is warm. Crayons melt in the heat so try color pencils for a nice treat.
  • I-Spy. Now I can only handle this little game for a very limited time but for those of you that can handle it kids seem to love it.
  • Binoculars. If you own a cheap pair bring them for the kids to use while driving or better yet let them make their own with empty toilet paper rolls. The optics aren't as good but it's the thought that counts right?
  • Blank Paper. There is really an unlimited amount of things a child can do with blank paper
  • Books. Break out a couple of favorites or hit the dollar store and pick up a new one.
Other Helpful Ideas
  • Take breaks. This one is difficult for me to do but it is certainly worth it. Stop at a rest stop and let the kids run. Play tag or bring a ball to play with when you stop.
  • Pack a lunch. Kids love picnics and for a family on a budget it's a simple way to control costs. Stop at a park if possible. Every town in every state has a playground, find it.
  • Window Shoping. We tent to stop at a large sporting goods store while traveling south and let the kids look at all the cool stuff. There are many places like this that have large fish tanks or animals on display. Not your speed? Most small tourist towns have a main street that survives on tourist traffic. Stop, walk around check out a cool old town.
  • Travel Books. This can range from from a AAA guide book to our family favorites the roadside history variety. Most libraries have a travel section with guides and roadside books are available at any tourist trap or bookstore.You can learn a lot just from driving with mind and eyes open.
 Links and Scavanger Hunt Lists
 
 Coloring Pages
 Family Favorite Travel Books and a few extras